Showing posts with label sewing. Show all posts

Saturday, May 5, 2018

A Handmade Hat: Jack and Jill Hat with Hearts

This post contains affiliate links.


I really like hats.  When I came across the Jack and Jill Hat by Izzy & Ivy Designs I knew I'd love it.  This pattern comes with a huge variety of sizes -- baby to adult.  The size range is a huge deal to me, because I just know that I am going to make a hat or two for myself!


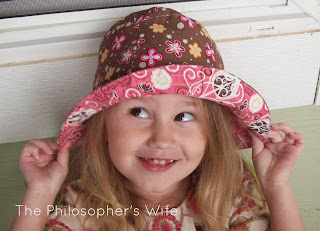
For this hat, I started with a fat quarter of the cheerful hearts fabric and simply picked coordinating fabrics from my stash.  I think it turned out quite nicely!  It's so bright and cheery!


Sadly, it looks like the pattern might be retired, as I can't find it in the Izzy & Ivy Designs Etsy Shop.  It can be purchased from Whimsical Fabrics, which is where I bought my copy.  The shop owner at Whimsical Fabrics gives amazing customer service.  (I also found a listing in Etsy by another third party.  This one is a little cheaper, but I have no personal experience with the seller.)


Overall, I found the directions to be clear for this Jack and Jill hat.  I did read through them twice in their entirety before beginning.  For some reason I was nervous to start this project.  However, once I decided to just do it I had no problems.  This hat took me about an hour and a half from start to finish, and that  includes the time it took to trace the pattern pieces.  (I should note that I left out the elastic in the back on this particular hat -- it just wasn't necessary this time.)

I see many more of these hats in my future! 


Below are some of the bucket hats that I've sewn.


Monday, October 31, 2016

Halloween Shirts for the Whole Family

This post contains affiliate links.

I made coordinating Halloween shirts for the whole family. There's a "secret ingredient" that I used for all of these shirts that might surprise you.  Can you guess what it is?


Catherine's shirt is a heavily modified Free Hoodie from Brindille & Twig.  I shortened the sleeves, omitted the hood and pocket, and added a ruffle to the bottom.  Removing the hood meant that I had to add a neckband; I used the 80% rule and it worked splendidly. The ruffle was a width of fabric and then gathered and attached with a serger.  I am super happy how her shirt turned out!


Dominic's shirt is the School Bus T-Shirt from Oliver + S.  (I won my pattern during a sew-a-long with Whimsical Fabric.)  Dominic really, really, really loves green right now so he was quite happy with his shirt.  


My shirt is the Lane Raglan from Hey June Patterns.  (This one is actually from the pre-updated pattern.  I have yet to print the updated version.  I will.  Eventually.)  I think this is my favorite pattern to wear.  

Don't worry, Hubby isn't missing out on the fun!  (It is "fun", right honey?)   He's getting a GreenStyle Men's Hudson Hoodie.


Did you guess my "secret ingredient" for these shirts?  It's a pair of leggings.  Well, two pairs actually.  I found cute pumpkin leggings in the juniors department at Walmart for less than $4 and all I could see was fabric.  I snatched them up and I think they worked wonderfully for these shirts!  What do you think?  Surprised?  Or did you see it coming?

The black cotton lycra is from NR Fabrics.  It has a great weight and stretch.  It's definitely a quality fabric.  The green is from Girl Charlee.  It's a bit lighter weight and the stretch is a bit less.

Happy Halloween!


Sunday, September 4, 2016

Sandbox Shorts: Pattern Review

This is a sponsored post.  This page may contain affiliate links. 

Are you looking for an adorable shorts pattern for your doll?  Then you should check out the Sandbox Shorts by Oh Sew Kat!  


I particularly like the flat front; the shorts just look so much more professional with the flat front. Most of the other doll shorts patterns I've seen lacked this detail. 


These shorts are an easy sew.  Like the Popsicle Top, the instructions are very well written and include lots of photos.  This pattern is especially awesome because it includes three different styles: Classic, Bermuda, and Wide Leg.  The brown floral shorts that I made are Classic, without pockets.  (Catherine didn't want to cover up the fun flowers, so I didn't.)  

While this is a fairly simple pattern, the possibilities are endless!  It's so versatile!  Different trims and different fabrics will give you anything from gym clothes to special occasion wear.   

Please take a moment to visit Oh Sew Kat! and follow her on social media.  
Facebook    Twitter    Instagram    Pinterest 

Oh Sew Kat! is sponsoring a giveaway!

Buy the Sandbox Shorts at CraftsyEtsy, or on the Oh Sew Kat! website.


Popsicle Top: Pattern Review

This is a sponsored post.  This page may contain affiliate links. 


The Popsicle Top by Oh Sew Kat is the perfect shirt pattern for your doll!  It's a simple tank, so it can be paired with just about anything, plus it can be reversible and it's easy to embellish.  I highly recommend this sewing pattern.


The Popsicle Top is an easy sewing pattern.  The instructions are also very clear and include lots of pictures.  (If you want to just print straightforward instructions there's a page for that too!)  I've been sewing off and on for a while, but I think even someone just learning to sew would be able to make the Popsicle Top.


This is a great project for either fat quarters or the leftovers from other projects.  I used random bits from my scrap bin and I just love how these shirts turned out!  I'm excited though, because now I have a perfect project anytime I fall in love with a fat quarter and just "need" to have it.  (I do need to remember to get some more Velcro, I only had a teeny amount in my stash.  If you're making doll clothes you're going to want some extra on hand too!)


I don't know about you, but whenever I use anything from my scrap bag I am reminded of the original projects.  The above top is made from some scraps from my Fabric Headbands, a dress I cut up for fabric, and some bias tape from the edging of a quilt for Catherine.  It's a walk down memory lane!  (Also pictured are the Sandbox Shorts, also by Oh Sew Kat!, and a little sweater I knitted which is modeled after the In Threes Sweater.)


This top and skirt set is made with some of my my favorite quilting cotton.  I made matching Mommy and Me Easter dresses with it one year.  (Art Gallery has a gorgeous knit fabric that is quite similar that I'd absolutely love to have!)


Buy the Popsicle Top at Craftsy, Etsy, or on the Oh Sew Kat! website.

If you're looking for an easy doll skirt pattern that pairs perfectly with the Popsicle Top, Oh Sew Kat has you covered.  Sign up for her email list and she'll send you the free pattern!


Please take a moment to visit Oh Sew Kat! and follow her on social media.  

Monday, May 9, 2016

Alice in Wonderland Character Greeting and Handmade Costume

This post contains affiliate links.


Somewhat to my surprise, Catherine requested an Alice in Wonderland costume for Halloween last year.  While I was surprised, I was up to the challenge.  It's been ages since I read Lewis Carroll's Alice's Adventures in Wonderland (the Kindle version is only $0.99!), but what I remember of it was that it was rather . . . odd.  Much like Disney's Alice in Wonderland, which is currently how Catherine is familiar with Alice, and that is the look she wanted.

Buy the movie from Amazon.
The traditional Disney Alice has a very timeless dress with an apron.  I used the Fairy Tale dress from Oliver + S for the dress.  (I won mine during a giveaway from Whimsical Fabric.)  I pretty much followed the pattern exactly for view A.  It's such a classic dress for a little girl, and was exactly what I needed!  However, I left off the skirt lining, as well as the tulle, and opted for a removable puffy underskirt.  I also used width of fabric for the skirt front and (added together) for the back because I wanted to capture the fullness of Alice's dress.  It was my first time doing an invisible zipper.  (I have various individuals from sewing groups to thank for my success in that endeavor.)


I free-handed the apron.  This took me lots of trial and error.  I really wanted an apron that looked like it was from the Disney movie.  I'm actually rather surprised how much Disney's Meet and Greet Alice's apron isn't like the movie.  Where is the rounded shoulder detail?  Why is there the additional cross in the back?  Their apron is seriously not true to the movie at all and it bothers me!  Is that because I'm a purist or because I sew, so I'm always looking at how a garment is constructed?  I'm not sure.  Maybe it's a little bit of both.


Alice's dress is rather full and flouncy (both in the movie and on the character at Disney World!), so I needed to add an underskirt.  Since we have a lot of princess type dresses in our future, I decided to make it a separate garment.  The underskirt is a couple of yards of tulle gathered onto half inch elastic.  (By the way, have you seen Rae Gun's gathering tip?  It has made my life so much easier!)  The tulle underskirt certainly adds some pouf!


Catherine loved the dress, which made me super happy.  Of course, I also relished the fact that everyone knew who she was on sight!  Well, except for that one lady during trick or treating . . . she thought Catherine was Mary Bo Peep.


Just recently, Catherine was able to show her dress to Alice in Wonderland at EPCOT.  (She's found in the United Kingdom part of the World Showcase.  Times are always available online.)  It was such an adorable exchange.  Alice kept referring to Catherine as "me".  I am constantly in awe of the Disney cast members.  Catherine tends to get a little star struck when meeting her Disney favorites, but they all do such an amazing job of making it a special experience.  Alice was simply delightful.


I also love that the photographers allow us to take as many pictures as we want.  I click away pretty much constantly during every character meet at the four Disney parks I've been to and every time I've been met with nothing but kindness.  In fact, most of the photographers have even offered to take photos using my camera if I want to be in the picture.  We always scan our bands too, for the Photo Pass, but we haven't actually purchased any . . . yet.

Just one more little critique of Disney's Meet and Greet Alice (the costume, not the girl): what is up with the white collar?  In the movie it clearly is blue to match the dress!


Sunday, March 13, 2016

A Sewing Project: Hearts Hoodie

This post contains affiliate and referral links.


I {heart} this hoodie!

Catherine needed (maybe "needed" is a bit strong, but you know what I mean!) some St. Valentine's Day bling this year.  So what's a crafty mom to do?  Sew up a hoodie!  

The pattern I used is the Free Hoodie pattern from Brindille & Twig.  You can get it too, just go to the site, scroll down to the bottom and look for "Free Pattern".  I did make a few modifications and eliminations.  I did not do the shoulder trim. I did not do a banded bottom.  I did not add the kangaroo pocket.  I did not do a lined hood.  


I modified the front of the hood a bit.  I prefer more of a crossover look to the original.  I think my way ends up with a slightly wider head hole too.  (Which is good for my large-headed kiddos!)

The fabric is a lightweight French Terry from Girl Charlee.  (I think it was a limited time fabric from last year.)  It was my first time working with French Terry.  It's all the rage right now in most of my sewing groups and I can see why.  It's soft, easy to work with, and quite comfortable.  


This was such a great project.  Cut to finish was less than 45 minutes, which included a cutting snafu.  The pattern is super simple, especially pared down like I did it, and having a serger makes the sewing part just fly!  I like this hoodie so much that I need one of my own!  I think I have enough fabric left to sew myself a matching hoodie, although mine will probably be a Lane Raglan.  

If you're new to either of the two online shops I mentioned, Brindille & Twig or Girl Charlee, it would be awesome if you go through my links to make a purchase!  I will receive a small referral bonus and I believe you will receive a percentage discount.  It's a win-win!


By the way, Catherine is modeling her hoodie outside of Mission: SPACE at EPCOT.  This is such a great ride!  If you go be sure to do the ORANGE mission, it's pretty amazing.  Have you been there?


I will be sharing this post at these awesome blogs!

Thursday, February 4, 2016

The Julia Women's Cardigan

A giant thank you goes out to Mouse House Creations for giving me the opportunity to try out this pattern!
This post contains affiliate links.

Do you have a sewing pattern that you just know you're going to use over and over again?  Or maybe you already have used it multiple times?  Well, the Julia Women's Cardigan by Mouse House Creations is one of those patterns for me.

Seriously, this pattern is awesome!  It's nice and easy to sew.  The directions are clear.  I'd call myself an advanced beginner and had no issues at all.  As you can see, I made the extended cap sleeve version (this time!), but there are instructions included for 3/4 length and full sleeves as well.  So many options!


The knit fabric is from Girl Charlee.  I'm digging the stripes, although someone might have commented that I looked like a pirate while wearing this particular version of the cardigan. . . .  

I have set aside fabric for at least three more of these.  I'm hoping to cut one out during nap time today. The only question is do I make another extended cap sleeve or a 3/4 sleeve?


Have you made a Julia Cardigan? I'd love to see it!


Tuesday, June 9, 2015

A Sewing Project: The Fox Hat


Dominic needed a pool hat.  I happily decided to sew him one.  I have been very happy with the hat that I made for Catherine a while ago.  I had some adorable fox fabric in my stash.  While technically the hat is reversible, the other side is just plain boring grey.


I used the same free pattern from Oliver + S that I used before as well as the same method of construction by Jessica.  (Her method eliminates hand sewing.  I appreciate hand sewing as a skill  . . . but it takes so much time!)  This hat needed to be practical, not perfect.  


My handsome little model wouldn't stay still for more than .0009 seconds, so these are the best shots that I got.  Of course, he (and his sister) were eager to get to the pool, so I guess that I can't really blame him, can I?

Just curious, did any of you notice my "big" mistake with this hat?  

I was kicking myself for not paying closer attention to what I was doing.  The foxes on the back of the crown are standing on their heads.  (Yes, I realize that now EVERYONE will notice my mistake.)  When I was first laying out the pattern to be cut I remember thinking, "OK, Rachel, just be careful that you get the foxes straight."  Whoops. 


Thursday, June 4, 2015

Sewing Fail: A Summer Shirt


The other day I decided that I wanted to sew a sleeveless top.  I don't currently own any patterns for such a top, and my printer refuses to print unless every single ink color is filled to maximum capacity, so I went off on my own.

I had been browsing Pinterest, doing serious research, and saw lots of crafters successfully draft their own tank pattern from a shirt in their closet.  Easy enough, right?

Since I was leaving my comfort zone by going pattern-free it was an it was an obvious decision to not use any of my good fabric.  This seemed like a good idea, but it might have been the biggest contribution to this project's ultimate fail.  Years ago, I had picked up some highly discounted mystery fabric for a steal.  (I think it was something crazy like fifty cents a yard.)  Well, it's some sort of polyester blend (I guess) and it melts when ironed.  It also frays like crazy.

In theory, I really like this tank.  I love the long back.  (Which I totally free-styled!  My original tank was just a boring hip length shirt.)  I managed to get the bust darts in about the right place to give the front just a teeny bit of shaping.  The fabric is lightweight, airy, and has some nice drape.

In practice though, it's rather a fail.  The hems are atrocious.  I hadn't quite realized how much I rely on my iron to make my hems neat.    The neckband screams "I'M HANDMADE!" in a bad way.  Again, I hadn't realized how much an iron helps.  I also used bias tape that was way too wide.  It's just a disaster.

From a distance it doesn't look too bad, but up close it's just not good.  What do you think?  I did learn things through this process.  I also did enjoy my time while creating.  I am reminded of this post by Melly Sews, "Why You Should Sew -- Badly".  I might wear this top around the house a few times, but I highly doubt I'd wear it in public.  (Other than on this public blog!)

What was your most recent craft fail?  What's your favorite tank sewing pattern?  Have you worn some of your fails?


Shop now and get $10!


Tuesday, May 5, 2015

A Skort for Catherine: The Monkey Bar Skirt (A Sewing Project)

This post contains affiliate links.

When I first saw the Monkey Bar Skirt by Crafterhours I simply knew that I'd be making it.  The pattern is free on Craftsy and super easy.  While my girl spends many days dressed up as a princess and loves ballet, she also loves adventurous play.  And she plays hard.  I like giving her a wardrobe that can take her anywhere.  This skirt, with its attached shorts, (hence skort) is perfect for anything -- princess heels or mountain climbing.


I'm an advanced beginner when it comes to sewing.  I made this skort in less than two hours.  (That's reading through the pattern, cutting, sewing, and clean up.)  I think the second time will be even faster.  The material is Navy Blue Tonal Stripe Cotton Jersey Knit Fabric from Girl Charlee.  It's the leftovers from the blue stripes dress that I made for myself.


Since I was using remnants from a previous project I didn't bother with matching the stripes.  I also couldn't get a waistband sized piece without making the stripes vertical.  Although, in all honesty, I really like how that turned out.  I made a size 5, and it seems spot on "regular" sizes.  I do think that I will lengthen the shorts part next time.


By the way, I totally recommend Girl Charlee fabrics.  I bought a bunch of fabric from them during one of their big pre-Christmas sales and have been super happy with everything.  If you're new to them I'd greatly appreciate if you'd use my referral link, I get a couple bucks for every new customer I send their way.  There are some pretty summer knits calling my name . . . 


I love linking up at all of these places.


Tuesday, March 17, 2015

Blue Stripes Knit Dress

This post contains affiliate links.  Thank you for your support!

Last week was Selfish Sewing Week.  I was hoping to sew last week and blog about it . . . but that didn't happen.  Today I am sharing the Blue Stripes Dress that I made a couple of weeks ago.


I used this New Look pattern.  Overall the pattern is pretty easy to follow.  The band that goes around the neck is too short.  Or at least, I did something wrong and just don't know what.  I also goofed a bit on the front.  I was supposed to have more darting and draping, but I think it's still alright.   (I also ditched the ties.)


I love the knit fabric!  It's from Girl Charlee when they had their awesome Black Friday sale (or was it Cyber Monday?).  It's the Navy Blue Tonal Stripe Cotton Jersey Knit Fabric.  It really is quite a deal, even at regular price.  (Especially because it's 66 inches wide!)


This dress was a stretch of my skills.  I've only worked with knits once before -- ages ago at a 4-H summer program.  And, just for fun, it's a striped fabric.  Badly cut strips can look ridiculous.  Also stripes that don't match up look sloppy.  I am so happy that my stripes (pretty much) match up!  I was also excited to discover that my sewing machine had a "honeycomb" stitch just for knits.


I have such a terrible time trying to photograph myself, so I had Catherine, age four, take these pictures. How do you think she did?  While it was a delightfully warm spring-like day it was quite windy while we were attempting our photo session.  


I have the sewing bug again!  I am going to attempt Mother and Daughter Easter dresses.  (Which I need to get started right away!)  We shall see what new skills those bring!


Thank you so much for visiting!  I'd love to have you follow me by email or Bloglovin'.