Showing posts with label Love Knitting. Show all posts

Friday, May 11, 2018

The Watermelon Hat: A Free Knitting Pattern

I received the yarn for this project in exchange for my honest opinion. This post contains affiliate links. This means that if you purchase something after clicking on one of these links I might receive a small commission. This is no way affects the price that you pay.

A girl is wearing a pink, green, and white hat with black beads.

This gorgeous yarn is from Love Knitting.  This fun Watermelon Hat was knitted using MillaMia Naturally Soft Aran in Shocking Pink and Emerald Green.  This yarn is so soft and squishy!  It's such a fun cozy yarn.  Each ball has 87 delicious yards of yarn.  It can be machine washed, but don't put it in the dryer, it needs to dry flat!  There is lovely stitch definition and it was a pleasure to knit.  I'd absolutely love to work with it again!

(I must say though, that while I loved knitting the yarn, trying to get a good picture of the pink, was, well, shockingly difficult!)

This is a close up shot of the hat brim.  The watermelon theme is carried out with the use of color.

The Free Knitting Pattern

Begin knitting this hat with size 5.5 circular knitting needles.  I knit the entire hat on circular needles using the magic loop technique.

With GREEN yarn. 
Cast on 80.  Join, being super careful not to twist.  I used the crochet hook cast on method, I really like the look and I'm super comfortable with a crochet hook!

Work a rib knit for about one inch, I had six rows.  I used a K1P1 rib knit, but you could use a K2P2 rib knit, whichever you prefer.

With white yarn.

Knit around.

Switch to size 6 circular knitting needles.

With Pink Yarn

Before knitting with the pink yarn you must add your "seeds".  When choosing your beads be sure that they will easily string onto the yarn.  I used some black beads, very much like these beads, from my craft hoard.  Use my yarn threading tip to make it easier and then thread on about 100 beads.  You will need to continually push the beads down towards the ball of yarn while you're knitting.  If you find this tiresome you could sew the beads on individually after you've finished knitting.  I randomly allowed the beads to be worked in.

Knit around.  Continue until hat reaches about four and a half inches high.  For reference, I knit 21 rows in pink before my first decrease row.

Decreases:
Round 1: *Knit 20 Stitches. Place stitch marker* four times around to end of round.
Round 2: *K1, K2tog, Knit to two stitches before next marker, SSK* four times around.
Repeat round 2 until there are 16 stitches remaining.
Round 3: K2tog around.
Break yarn and weave it through the remaining 8 stitches.  Finish off!


A note about the sizing of this hat.  My lovely daughter modeled this hat for me.  As you can see it fits her comfortably with just a slight amount of slouch.  The hat also fits me quite well.  Her head circumference is about 21 inches and mine is 22 inches.  

A smiling girl is wearing a knitted watermelon hat.


Thursday, April 26, 2018

Little Green Adventurer Backpack

I received the yarn for this project in exchange for my honest review.  This post contains affiliate links.  This means that if you purchase something after clicking on one of these links I might receive a small commission.  This is no way affects the price that you pay.

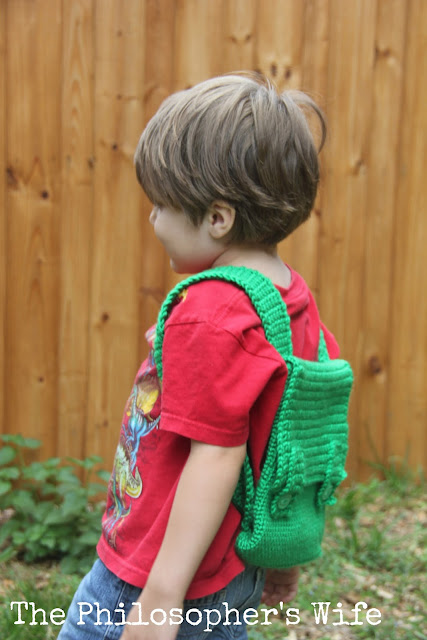
A boy in a red shirt is wearing a crocheted green backpack.  There is wooden fence in the background.  The boy's face is hidden.

When Love Knitting asked if I would be interested in reviewing some of their yarn, of course my answer was yes!  Who's surprised?  No one?

Yarn My middle child's favorite color is green, and it was his turn for some Mama made goodies, so this Main Street Yarns Shiny + Soft in Grass Green was perfect.  It is a 100% acrylic yarn.  It can be machine washed and dried, a huge plus for a kid's item!  The skein had 356 yards, which was a perfect amount for this project, I had only the tiniest amount of leftover yarn.  The yarn worked up quite easily with nice stitch definition.  It is nice and soft right out of the box.  There's a slight sheen, or shininess, to it.

Hook I used my Clover Amour size 7 crochet hook.  This is a little smaller than the recommended hook size of H/5 mm.  I wanted the body of the bag to be rather densely crocheted, to keep all of my little adventurer's finds from escaping.

The boy is wearing a red shirt.  He is stretching his arms out, along with the green straps of his backpack.


(Free!) Crochet Pattern

Bag

Chain 26.

Round 1 IN TOP LOOP ONLY Single crochet (sc) in second chain (ch) from hook, and in each of the next 23 chains (24 sc). Work 3 sc in the last chain.  Work back down foundation chain in opposite loop. (23) 3 sc in  last chain. slip stitch to join.

Round 2 Chain 1. (Working in both loops) 2 sc in the first stitch. Sc in next 23sc. 2 sc in each of the next 3 sc. Sc in next 23 stitches.  2sc in each of the next 2 sc. slip stitch to join.

Round 3 2 sc in first sc from previous round.  Sc in next 25. 2sc in next stitch. 1 sc. 2sc in next stitch (at the "end" of the oval). 1 sc in next stitch. 2 sc in next stitch. 25 sc. 2 sc in same stitch. 1 sc. 2 sc in next stitch ("end" of oval). 1 sc. slip stitch to join.

Round 4 2sc in 1st stitch. 28 sc.  2sc in next stitch. 1 sc. 2sc in next stitch (at the "end"). 1 sc in next stitch. 2 sc in next stitch. 28 sc2 sc in same stitch. 1 sc. 2 sc in next stitch ("end"). 1 sc. slip stitch to join.

Round 5 Chain 1. IN TOP LOOP ONLY sc around. Slip stitch to join.

Rounds 6-44 Chain 1. Sc around. Slip stitch to join. (72 stitches total)

Round 44 Chain 1. Sc 4. 32 in back loop (inside the bag) only.  36 sc. slip stitch to join. (Note: the 32 back loop only should be centered along the back of the bag.  Adjust accordingly if needed.  This is where the flap will be added later.)

Round 45 Chain 2. sc around. (72)

Round 46 Slip stitch around.

Flap

Row 1 Single crochet in each of the front loops left from round 44.  (32)

Rows 2-27 Chain 1. Turn. Sc across. (32)

Strap 

Make two.

Chain 7.

Row 1 Sc in second chain from hook.  Sc across. (6)

Rows 2-72 Chain 1. Turn. Sc across. (6)

Button Flaps

Chain 5.

Row 1 Sc in second chain from hook.  Sc across. (4 sc stitches)

Rows 2-12 Chain 1. Turn. Sc across. (4)

Row 13 Chain 1. Turn. 1 sc 2 ch 1 sc. (This forms the button hole.)

Rows 14 & 15  Chain 1. Turn. Sc across. (4)

Finishing Sc evenly around, with three stitches in each corner.

Assembly

Whip stitch the straps to the bag, lining up the edge of the strap with the edge of the flap.

SC around all edges other than the opening.

Whip stitch the button flaps onto the bag flap.

Sew buttons.

Enjoy!


This is a side view of the little boy in a red shirt with a green backpack.  He is ready for an adventure!