Showing posts with label free. Show all posts

Saturday, March 14, 2020

Free Crochet Pattern: Twisted Knot Ear Warmer

This post contains affiliate links.

This crocheted Twisted Knot Ear Warmer works up quickly and makes an adorable accessory!

The yarn is from Kimarie's Knit Knacks.  It's called Unicorn Fields.  I've been hoarding the remainder of the skein from my Sterling Unicorn Hat waiting for inspiration to strike.  I actually had started a couple of projects with the yarn, but they just didn't seem worthy so they were frogged.  The colors are striking, and it's so squishy and soft.  Such great yarn!

Free Crochet Pattern of Sterling Unicorn Hat

Ear warmers are all the rage!  I've even seen a fair share of them here in Central Florida.  As I was cleaning my craft area I came across this yarn again and inspiration struck!  The very next afternoon between homeschooling and library books this Twisted Knot Ear Warmer came into existence.


The lovely, knit-like, detail in the texture of the headband comes from crocheting in the third loop of the half-double crochet below it.  If you haven't done this before it might sound intimidating, but it's really easy once you know what you know where to look!

When working a row of crochet you (generally) end up with a "v" on the top.  The side of the "v" closest to you is referred to as the "front loop" and the side of the "v" further away is the "back loop".  In a half-double crochet there is actually a third loop that's under the "v" that is made from the yarn over (YO) in the stitch.  "HDC in the third loop" means that you are going to create your hdc stitches around this loop under the "v". Doing this will force the "v" to face the front.

Chain 111 using an F hook.

Row 1: Skip the first chain and half-double crochet (HDC) across. This should give you 110 stitches.  Chain 1 and turn.

Row 2: HDC in third loop.

Repeat rows 1 & 2


At this point you have a nice flat, knotless, fabric.  You could sew the ends together and call it a day--that would leave you with a perfectly lovely ear warmer.  However, if you'd like to add a little more flair, then you need one more step.


To achieve the trendy twisted knot we need to sew the ends together just right.  Fold the ends lengthwise so that you end up with four ends.  Alternate the sides and then sew.  I find it helpful to baste first and check to make sure that everything looks right before the final sew.  When sewing the finishing bit, make sure to catch all four layers of fabric.  This is very important!

If you're having trouble envisioning the above step try this first: Make a "c" with both of your hands--your left hand will be a correct "c" and your right will be backwards.  Put them together with your left hand fingers on top, right hand fingers next, left hand thumb, and finally the right hand thumb.

Weave in any ends and enjoy!  (Side note: I know that plastic yarn needles are really popular, but I really love my stainless steel yarn needles.)


Thanks for visiting my blog!  

I love to link up at all of these wonderful blogs!

Other posts that you might enjoy:

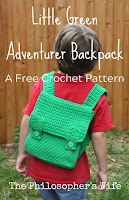
 A boy in a red shirt is wearing a crocheted green backpack.  There is wooden fence in the background.  The boy's face is hidden.  

Friday, May 11, 2018

The Watermelon Hat: A Free Knitting Pattern

I received the yarn for this project in exchange for my honest opinion. This post contains affiliate links. This means that if you purchase something after clicking on one of these links I might receive a small commission. This is no way affects the price that you pay.

A girl is wearing a pink, green, and white hat with black beads.

This gorgeous yarn is from Love Knitting.  This fun Watermelon Hat was knitted using MillaMia Naturally Soft Aran in Shocking Pink and Emerald Green.  This yarn is so soft and squishy!  It's such a fun cozy yarn.  Each ball has 87 delicious yards of yarn.  It can be machine washed, but don't put it in the dryer, it needs to dry flat!  There is lovely stitch definition and it was a pleasure to knit.  I'd absolutely love to work with it again!

(I must say though, that while I loved knitting the yarn, trying to get a good picture of the pink, was, well, shockingly difficult!)

This is a close up shot of the hat brim.  The watermelon theme is carried out with the use of color.

The Free Knitting Pattern

Begin knitting this hat with size 5.5 circular knitting needles.  I knit the entire hat on circular needles using the magic loop technique.

With GREEN yarn. 
Cast on 80.  Join, being super careful not to twist.  I used the crochet hook cast on method, I really like the look and I'm super comfortable with a crochet hook!

Work a rib knit for about one inch, I had six rows.  I used a K1P1 rib knit, but you could use a K2P2 rib knit, whichever you prefer.

With white yarn.

Knit around.

Switch to size 6 circular knitting needles.

With Pink Yarn

Before knitting with the pink yarn you must add your "seeds".  When choosing your beads be sure that they will easily string onto the yarn.  I used some black beads, very much like these beads, from my craft hoard.  Use my yarn threading tip to make it easier and then thread on about 100 beads.  You will need to continually push the beads down towards the ball of yarn while you're knitting.  If you find this tiresome you could sew the beads on individually after you've finished knitting.  I randomly allowed the beads to be worked in.

Knit around.  Continue until hat reaches about four and a half inches high.  For reference, I knit 21 rows in pink before my first decrease row.

Decreases:
Round 1: *Knit 20 Stitches. Place stitch marker* four times around to end of round.
Round 2: *K1, K2tog, Knit to two stitches before next marker, SSK* four times around.
Repeat round 2 until there are 16 stitches remaining.
Round 3: K2tog around.
Break yarn and weave it through the remaining 8 stitches.  Finish off!


A note about the sizing of this hat.  My lovely daughter modeled this hat for me.  As you can see it fits her comfortably with just a slight amount of slouch.  The hat also fits me quite well.  Her head circumference is about 21 inches and mine is 22 inches.  

A smiling girl is wearing a knitted watermelon hat.


Thursday, April 26, 2018

Little Green Adventurer Backpack

I received the yarn for this project in exchange for my honest review.  This post contains affiliate links.  This means that if you purchase something after clicking on one of these links I might receive a small commission.  This is no way affects the price that you pay.

A boy in a red shirt is wearing a crocheted green backpack.  There is wooden fence in the background.  The boy's face is hidden.

When Love Knitting asked if I would be interested in reviewing some of their yarn, of course my answer was yes!  Who's surprised?  No one?

Yarn My middle child's favorite color is green, and it was his turn for some Mama made goodies, so this Main Street Yarns Shiny + Soft in Grass Green was perfect.  It is a 100% acrylic yarn.  It can be machine washed and dried, a huge plus for a kid's item!  The skein had 356 yards, which was a perfect amount for this project, I had only the tiniest amount of leftover yarn.  The yarn worked up quite easily with nice stitch definition.  It is nice and soft right out of the box.  There's a slight sheen, or shininess, to it.

Hook I used my Clover Amour size 7 crochet hook.  This is a little smaller than the recommended hook size of H/5 mm.  I wanted the body of the bag to be rather densely crocheted, to keep all of my little adventurer's finds from escaping.

The boy is wearing a red shirt.  He is stretching his arms out, along with the green straps of his backpack.


(Free!) Crochet Pattern

Bag

Chain 26.

Round 1 IN TOP LOOP ONLY Single crochet (sc) in second chain (ch) from hook, and in each of the next 23 chains (24 sc). Work 3 sc in the last chain.  Work back down foundation chain in opposite loop. (23) 3 sc in  last chain. slip stitch to join.

Round 2 Chain 1. (Working in both loops) 2 sc in the first stitch. Sc in next 23sc. 2 sc in each of the next 3 sc. Sc in next 23 stitches.  2sc in each of the next 2 sc. slip stitch to join.

Round 3 2 sc in first sc from previous round.  Sc in next 25. 2sc in next stitch. 1 sc. 2sc in next stitch (at the "end" of the oval). 1 sc in next stitch. 2 sc in next stitch. 25 sc. 2 sc in same stitch. 1 sc. 2 sc in next stitch ("end" of oval). 1 sc. slip stitch to join.

Round 4 2sc in 1st stitch. 28 sc.  2sc in next stitch. 1 sc. 2sc in next stitch (at the "end"). 1 sc in next stitch. 2 sc in next stitch. 28 sc2 sc in same stitch. 1 sc. 2 sc in next stitch ("end"). 1 sc. slip stitch to join.

Round 5 Chain 1. IN TOP LOOP ONLY sc around. Slip stitch to join.

Rounds 6-44 Chain 1. Sc around. Slip stitch to join. (72 stitches total)

Round 44 Chain 1. Sc 4. 32 in back loop (inside the bag) only.  36 sc. slip stitch to join. (Note: the 32 back loop only should be centered along the back of the bag.  Adjust accordingly if needed.  This is where the flap will be added later.)

Round 45 Chain 2. sc around. (72)

Round 46 Slip stitch around.

Flap

Row 1 Single crochet in each of the front loops left from round 44.  (32)

Rows 2-27 Chain 1. Turn. Sc across. (32)

Strap 

Make two.

Chain 7.

Row 1 Sc in second chain from hook.  Sc across. (6)

Rows 2-72 Chain 1. Turn. Sc across. (6)

Button Flaps

Chain 5.

Row 1 Sc in second chain from hook.  Sc across. (4 sc stitches)

Rows 2-12 Chain 1. Turn. Sc across. (4)

Row 13 Chain 1. Turn. 1 sc 2 ch 1 sc. (This forms the button hole.)

Rows 14 & 15  Chain 1. Turn. Sc across. (4)

Finishing Sc evenly around, with three stitches in each corner.

Assembly

Whip stitch the straps to the bag, lining up the edge of the strap with the edge of the flap.

SC around all edges other than the opening.

Whip stitch the button flaps onto the bag flap.

Sew buttons.

Enjoy!


This is a side view of the little boy in a red shirt with a green backpack.  He is ready for an adventure!

Monday, February 6, 2017

Be My Valentine: Crochet Heart (Free Pattern)

This post contains affiliate links.

Here's a unique Valentine to give this February!  Of course, it makes a sweet little gift anytime of the year!

Materials
I used Sugar 'n Cream cotton yarn and an H hook. (I find it rather amusing that all but one of these colors has "hot" in the name.)

Pattern Notes
This is not a tested pattern.  It also presupposes a basic knowledge of crochet.  I'd rate this as an advanced beginner pattern.

Free Crochet Heart Pattern

Round 1 (Hot Pink)
Chain 4. Join.  Start like a basic granny square: chain 2, 2 dc, chain two, three dc. chain two, three dc.chain two, three dc. chain two, three dc. Chain two, join.

Round 2 (Beach Glass)
 3 dc, ch 2, 3dc in each corner, chain one between each corner.

Round 3 (Hot Purple)
Slip stitch to join in a corner.  10 triple crochet stitches into the chain one space.  Slip stitch in corner. 10 triple crochet stitches into the chain one space.

Round 4 (Hot Blue)
Single stitch around.
Note: Chain 2 at heart point.
Note: On purple, single crochet in each stitch but chain one between each stitch.

Round 5 (Hot Orange)
Slip stitch in back loop of the blue.
Note: Chain two at the point.

Weave in your ends and enjoy!


As always, I enjoy sharing my projects around the blogosphere.  Here are the some of the places where I link up!


Saturday, January 7, 2017

Granny Stripe Hat

This post contains affiliate links.


This Granny Stripe Hat is my first of the Granny-Spiration Project.  (Read more about this below, and be sure to enter the giveaway!)  This is an easy hat to crochet and works up quite quickly.

I used an H hook and Caron Simply Soft.

A note about fit and size:  This is a slouchy hat.  My lovely model has a larger than average head circumference for her age.  This hat would properly fit teens and ladies.

Chain 5. Join.

Row 1  *Two dc, chain 1*around until there are six groups of 2dc.

Row 2  Crochet 2 groups of 2dc in each chain one space of previous row, make sure to chain one between each group. (12 groups of 2dc)

Rows 3 &4 Crochet 3dc in each chain one space, keeping the chain one between each group.

Row 5 Crochet 2 dc groups of three in each chain 1 space (always have a chain one between each group)

Row 6 - 10 3 dc groups in each chain with a chain 1 between each one.

Row 11 HDC around.

Rows 12 through 15 HDC in the third loop.  Finish off.


This Month's Giveaway is sponsored by EyeLoveKnots. 

One winner will receive a $10 Etsy Card to spend in any shop on Etsy!

a Rafflecopter giveaway

Must be 18 or older to enter. Open to all countries. Gift card has been purchased in US Dollars. If recipient is outside of the US, to use gift card, must go into Etsy settings and temporarily change to US Dollars. Void where prohibited. Winner has 48 hours to respond to email notification, or another winner will be chosen. EyeLoveKnots is responsible for prize fulfillment and shipment.


New Granny-Spiration Projects will be shared from your hosts the first Saturday of each month. Post times will vary. You will be able to link up from 9am EST on the first Saturday of the month, through 11:59pm EST on the second Thursday from the start date - specific dates are on top of the Rafflecopter form - giving you almost two weeks to link up and enter the giveaway! Please share projects that are family friendly, and GRANNY INSPIRED through use of regular granny square or solid granny square, granny stitch pattern or other afghan square in the form of a free pattern, pattern review, or inspiration piece. Not limited to crochet or knit.

*Please make sure to link to your post, and not your homepage.

 *If you don't have a blog, you can still share with us by creating a Free Flickr Account - powered by Yahoo. Add your projects there, and then come back here with the link for the project.

 *Link ups cannot be to Etsy listings or Ravelry pages where patterns are sold. You can link to blog posts, Flickr or Facebook pages, Pins, etc that are directed towards it, but can't directly link to it. To be clearer though, Raverly pages of finished projects are okay to share. Sorry for the inconvenience! That's per InLinkz guidelines. Thanks!

 *Features may be chosen at the discretion of each host. By linking up, you give us permission to feature your item.

Wednesday, November 23, 2016

The Sterling Unicorn Hat

This post contains affiliate links.  This post is sponsored.  Everything here is my own honest opinion.


This is my favorite hat right now.  I had such fun crocheting it!  This hat uses two of my favorite yarns, and I think both are stunning together.  The name of the hat is a simple mash up of the yarn colorways, but I think that it totally works!


Yarns Used
Unicorn Fields DK by Kimarie's Knit Knacks
This is 246 yards of 75% Merino & 25% Nylon hand dyed loveliness.  It even has sparkles!  Can I say that again?  My unicorn yarn has sparkles! It can be machine washed.  It is very soft and works up wonderfully.  I didn't encounter any tangles or messy bits.  Overall, it's an ideal yarn.


Marshall Island Sport in Sterling by String Theory Hand Dyed Yarn 
This is the same that I used on my Cherry Twist Hat and you can read all the details about the yarn there.


Hooks Used
Clover Amour H
Clover Amour I
(My Clover Amour hooks are my favorites!)


Pattern

Please Note: This is an untested pattern.  This pattern is made from the notes that I made while crocheting the hat.  If you encounter any problems or mistakes in the pattern I would greatly appreciate if you'd let me know and I'll do my best to help and/or correct the pattern.

Using H hook:

Chain 79.
Join without twisting.
Rows 1 - 6: 78 sc across, slip stitch into first stitch.

Using I hook:

Step 1: Using grey yarn: ch 4, dc in the first st (this counts as your first V stitch). *Skip 2 sts, [dc, ch 1, dc] in the next st. Repeat from * until 2 sts remain.  (This is a fairly standard starting row of V stitches). Slip stitch together.  Pull a long loop of yarn out -- enough that your work won't unravel while you work the next row.  NOTE: You will be alternating which yarn you are working with, but you will not be finishing off each row.

Step 2: Using unicorn yarn: Chain 3 in ch sp of 1st V st of previous round 2 DC. Three DC in each ch sp around.  Join with a slip stitch.  Again, pull a long loop of yarn so that this row won't unravel while you're working the next.

Step 3: Using grey yarn: Put your hook into the long loop of grey. Chain 4 and dc between first and last V of the grey round (note, this is not in the ch sp, but between the Vs). [Dc, ch 1, dc] between the earlier grey V stitches around.  Close with a slip stitch.  Pull out long loop of yarn.  (This is the row where the magic happens for this hat.  This row is how the unicorn clusters are surrounded and made to pop.  It does take a little getting used to -- you are working this new row with the row from not the last row but the row before that one. )

Step 4: Using unicorn yarn: Chain 3 in ch sp of 1st V st of previous round 2 DC. Three DC in each ch sp around.  Join with a slip stitch.  Again, pull a long loop of yarn so that this row won't unravel while you're working the next.

Work steps 3 & 4 until you reach your desired length.


Decrease part of the crown:

Using grey yarn.  *V stitch in first space.  1 dc in next space.*  Repeat around.
Using Unicorn yarn *3 dcs in each V space.* Repeat around.
Using grey yarn. Create a faux V stitch with a (dc, ch 1, dc) around, placing a dc on either side of the single dc in the spaces of the grey row below (continuing to capture the Unicorn yarn). Repeat around.
Using Unicorn yarn. *3 dcs in each faux V space.* Repeat around.
Using grey yarn. *V stitch in space between unicorn dc group (capturing the
Using Unicon *3 dcs in each V space.* Repeat around.
Using grey yarn.  *1 dc in space of each Unicorn group from below most recent row of unicorn stitches.1
Using grey yarn. DC2TG around.
If necessary, sc2tg around.

Finish off.


This was a mash up made in yarn heaven.  Both shops were wonderful to work with -- businesslike and friendly.  I highly recommend both Kimarie's Knit Knacks and String Theory Hand Dyed Yarn, as such both can be found in my Best Little Yarn Shops Gift Guide.


I will be sharing this post at some of these awesome parties!


Sunday, October 30, 2016

A Free Crochet Pattern: Peacock Hood

 This post contains affiliate links.


I loved crocheting this Peacock Hood!  I was lucky enough to get my hands on a couple of Caron Cakes in Gelato during the initial release.  I knew I wanted to crochet something using the crocodile stitch and, after much frogging and indecision, happened to create this adorable hood.

I must admit, I was originally hoping that this could be a one skein project, but that didn't happen.  It uses about one and a third.  (Which means that I have another Caron Cakes project in the works!)

I used my H hook.


A bit of a disclaimer: This is an untested pattern.  I wrote the pattern using the notes that I made while crocheting.  If you make this pattern I do welcome your comments and corrections, but please be kind.
1. Chain 109.   This is a multiple of 6 + 1, which is generally recommended for a crocodile stitch starting chain.  (It's 18 x 6 and then add one.)

2. Build your feather foundation, also sometimes referred to as the crocodile stitch ladder.  Do this by chaining three (which will act as your first double crochet stitch). Double crochet into the fourth chain from the hook.  *Chain one.  Skip two chains. Two double crochet into next stitch.* Repeat till end where you should work two dc into the final chain.


3. Turn your foundation ladder so that it is hanging down.To make each feather (or crocidele scale), you’re going to work stitches around the posts of the double crochet stitches that serve as the ladder rungs.   *Chain one then five double crochets down the post of the ladder, chain one, and then five double crochets up the post of the other rung pair. Skip the next pair of rungs.*   Continue along the length of the foundation row/ladder working down and then up each set of rungs.  You should end with a feather/crocodile scale in the last pair of rungs for a total of 19 feathers.  Note: You will need to flip your work around a bit as you're working.

4.   At this point your feathers are going to look a bit ruffled.  Don't worry!  This next row works as both the foundation for the subsequent row and locks the previous row neatly into place.  You are now going to work pairs of double crochet, separated by one chain, worked into the gap between one of the pairs of double crochet stitches below.  You will alternate between working your dcs into the space between scales as well as into the gap between dcs.  This means that you should have the same number of double crochet pairs throughout this entire section and that they should line up on top of one another.


5. It's time for another row of feathers!  However, the feathers need to be offset from the row below, so this row will have 18 feathers.  Chain two, skip the first set of double crochets/ladder rungs, and work your feather into the second set.  Continue as before, with five double crochets down the post of the ladder, chain one, and then five double crochets up the post of the other rung pair. Skip the next pair of rungs.


6. Repeat steps three, four, and five until you reach your desired length, to replicate my project you need seven rows of feathers.  It works best to end on a row with 19 feathers.

7. For the final row of the scarf portion of the hoodie the locking in mechanism changes slightly.  Work as step four instructs, however, use single crochet stitches over the first four feathers, switching to double crochet between feathers four and five.  You will mirror this for the other end of the scarf; between the fifth and fourth LAST feathers switch back to single crochet.


8. Now for the hood! Slip stitch (with the v's on the wrong side) to the first double crochet group.  Work 12  feathers into the double crochet row as normal, stopping once you reach the single crochet stitches.

9. Work step four's locking in row, only crocheting in the double crochet stitches.  We are no longer worried at all about the scarf part -- that's finished!

10. Work 11 feathers, this is the offset row so it has one less.


11. Continue working rows of 12 feathers, foundation, 11 feathers until your hood is as high as you'd like.  Mine is 14 row of feathers (not including the scarf portion).

12.  For the final locking in row use single crochet instead of double crochet.

13. At this point you will have what looks like a long skinny rectangle with another rectangle on top of it.  Fold it in half and slip stitch across the top.

14. Weave in ends and enjoy!


I used one of my Lilla Rose Flexi clips as a shawl pin for Catherine's Peacock Hood.  It would be super easy to add some fun buttons or toggles as well.


Wednesday, August 31, 2016

Crochet Owl Purse FREE Pattern

This is a sponsored post.  This post may contain affiliate links.

Did you enter September's Yarn Giveaway?


The 24/7 Cotton Yarn that Lion Brand sent me really is project inspiring.  I've been crocheting up tons of new projects to share with you!  Here's one of my favorites.  Catherine loves it too!  Which means it's a win-win project!  Those are the best!


Pattern Notes

  • Use a G hook except where noted.  
  • Pattern assumes a bit of crochet knowledge -- for example, there are no notes to chain one and turn at the end of a row.  
  • This is not a tested pattern.  I simply made notes as I freehanded this purse.  As such there are most assuredly mistakes and inaccuracies.  I do think that there is enough correct information here for you to replicate my project.  
  • Due to the above (assumes previous knowledge and it's not a tested pattern) I would say that this is an intermediate crochet pattern.


Front
I am only sharing the barest of instructions here for the crocodile stitch.  I am working on a full photo tutorial for this section, but for now this pattern presumes that you know how to crochet the crocodile stitch.  (Here's a great Craftsy class all about the crocodile stitch.)

Start with a chain of 25.
Make your starting ladder for the crocodile stitch.
5 crocodile scales in rose
4 scales in tangerine
5 scales in lemon
4 in sage
5 in aqua
4 in rose
5 in tangerine
4 in lemon
5 in sage
4 in aqua
5 in rose

Crochet the final "locking in" row with single crochet instead of double crochet stitches.
Single crochet across the top.

Back and Flap


With tangerine yarn
Chain 2
2 sc in stitch
2 sc in each (4)
2 sc, 2, 2sc (6)
Without breaking yarn sc down one side and up the next side of the triangle.

With rose yarn
8 sc across
Please note for the following 8 rows you will be adding two stitches to each row.  To do this single crochet two stitches in both the first and the last stitch of each row.
10 sc
12 sc
14 sc
16 sc
18 sc
20 sc
22 sc
24 sc
24 across for approximately 35 rows.


Strap
H hook -- with two strands of yarn, one auqa and one sage
ch 5
4 single crochet across
Repeat until you reach your desired length


Eyes
Chain 2
6 in first chain.
Two sc in each stitch (12)
2 sc in next st, sc in next st (18)
sc in next 2 sts, 2 sc in next st (24)

Add black buttons.

Construction

Assemble using your prefered method.  I used slip stitches, which give an added detail but bulky seams.  I think next time I will use a whip stitch and some thread for a more understated seam.


Sunday, August 7, 2016

Free Printable Disney Coloring Pages


I love coloring.  My kids love coloring.  Add a little Disney magic and we all are bound to have a good time.  These free printable pages could keep your kids busy to and from the parks, while you're in the hotel, be a great addition to your scrapbook, or just give you a few minutes of quiet.  

Click through the links below to get to the coloring pages of Disney princesses, Cars, Up, and of course, Mickey Mouse.  All together there are over 200 pages.


Disney Clips has 16 Inside Out coloring pages just waiting to bring you some joy.


I bawl every single time I watch Up, but these 9 Up coloring pages should be tear free.


There are 12 Jasmine coloring pages at Free Coloring.


Color from infinity to beyond with these Toy Story coloring pages.


Are you a Baymax fan?  Here's 35 Big Hero 6 coloring pages.


As you might expect Little Ariel has tons of Little Mermaid themed coloring pages.


Get your red crayons ready for your Cars coloring pages.


I rather love this Mickey Mouse coloring page from the Style Disney Blog.


Don't forget about the classics, like Lady and The Tramp.


Dory and Nemo can be found at Crayola.


Here's a page with over 20 Cinderella coloring pages.


These Tangled coloring pages look great!


Find 30 princess coloring pages at All Kids Network.


There are so many great Disney coloring pages out there in cyberspace!  If these aren't enough for you I have more pinned to my Disney Coloring Pages Pinterest Board.  Happy coloring!


Tuesday, April 5, 2016

Free Crochet Pattern: Treble Cluster Flower

This post contains affiliate links.

This crocheted flower is super simple to whip up!  It's downright adorable as an applique on blankets, hats, ear warmers, or even just on it's own.  I gave you a sneak peak of a bigger project that I'm working on, which include these cute little flowers.  I am excited to share this free crochet pattern with you now.

You can crochet these flowers with a single color, use multiple colors of yarn, different sized hooks, you can add buttons and beads as embellishments, there are so many options!  If you add buttons, use my little trick!  For the smaller flowers on this page I used a F hook and for the larger ones I used an I hook.  All the yarn is Sugar n' Cream.


Special Stitch
Treble cluster -- crochet three trebles stitches together.

1. Chain 2.


2. 5 single crochet stitches in first chain.  Join with a slip stitch.


3. *Chain 3. Treble cluster. Chain 3. Slip stitch in same stitch.* Repeat in all five stitches for five petals. Join and fasten off.  I made a little video of me crocheting one petal.  Here's the video.


4. Slip stitch to join.  Fasten off.


I love linking up at these blog parties.


Don't forget to check out this month's yarn giveaway!


Thursday, November 20, 2014

A Knitting Pattern: The Purple Ribbed Cowl

This post contains affiliate links. 

For such an easy knitting project finishing this cowl has been quite a journey.  It started when I was following a different pattern that wasn't completely ribbed.  I didn't like the way it curled so I frogged it.  (I think the curl effect doesn't work as well with the thick and textured Homespun yarn.  In my humble opinion, of course.)  Then I decided to make a cowl that simply was ribbed all around.  Well, I made a rookie mistake and accidentally twisted my foundation.  I didn't notice until I was a couple of inches into the cowl.  Whoops!  So I frogged it again.  The third time was a charm though!


Materials:
Yarn: Homespun by Lion Brand
Needles: Circular 8 mm


Pattern:

  • Cast on 100 stitches on circular needles.
  • Join.
  • Check to make sure your work isn't twisted.
  • Check again.  Seriously.
  • Round One: Knit two, purl two all the way around.
  • Check once more that your work isn't twisted.
  • Round Two: Repeat round one.  (Knit in all knit stitches and purl in a purl stitches.)
  • Continue until you reach your desired size, mine is about 12 inches tall.
  • Cast off and weave in ends.

This is super cozy, warm, and soft.  It's a great project for a beginner.  It's quick to make.  I think it would make a great handmade gift for a loved one this Christmas.

Follow on Bloglovin