Showing posts with label pattern. Show all posts

Tuesday, April 7, 2020

Another Crochet Project: Virus Shawl

This post contains affiliate links.


A Virus Shawl is a rite of passage for many crocheters.  The pattern had been languishing in my "Want to Make" queue for years. I made my first one just last year, I don't know how I managed to go so long without making one! When I found some discounted Caron Cakes Yarn I knew I would be crocheting another one soon.


My local Michael's had the Rainbow Sherbet variety on clearance so I scoured the shelves and found three of the cakes.  It's such a cheery colorway!  I'm a bit undecided on my overall opinion of such yarn: it's really nice to have color changes without actually having to change the yarn, but the abrupt changes only work well for certain types of projects.  Happily, I think this type of yarn works really nicely with the Virus crochet pattern.


I followed Julia Marquardt's pattern, which can be found on this page for free.  There is some debate about the origin of the Virus pattern, some argue it's been around for ages especially in non-native English speaking areas, but it certainly owes a large part of it's resurgence to Jonna Martinez and her Virus Blanket Pattern.


This was my first complete project using a Furl's Crochet Hook.  This hook is certainly a luxury hook.  I was a little hesitant to put it on my birthday wish list, but after using it I quickly added more to my Christmas wish list!  I was honestly surprised at how much I loved it.


UPDATE: I wanted to give an update on how well this yarn is holding up after many months of use and washing: it still looks great! The color hasn't faded and it's softer than ever.  It has "fuzzed" a little, but certainly not excessively.   (November 2020)


Have you crocheted Virus Shawl?  Or a Virus Blanket?  Did you enjoy the crochet experience?


Thank you for visiting! 
You might be interested in these
free crochet patterns:
A girl is wearing a crocheted hat looking off to the side.

A boy in a red shirt is wearing a crocheted green backpack.  There is wooden fence in the background.  The boy's face is hidden.

Saturday, March 14, 2020

Free Crochet Pattern: Twisted Knot Ear Warmer

This post contains affiliate links.

This crocheted Twisted Knot Ear Warmer works up quickly and makes an adorable accessory!

The yarn is from Kimarie's Knit Knacks.  It's called Unicorn Fields.  I've been hoarding the remainder of the skein from my Sterling Unicorn Hat waiting for inspiration to strike.  I actually had started a couple of projects with the yarn, but they just didn't seem worthy so they were frogged.  The colors are striking, and it's so squishy and soft.  Such great yarn!

Free Crochet Pattern of Sterling Unicorn Hat

Ear warmers are all the rage!  I've even seen a fair share of them here in Central Florida.  As I was cleaning my craft area I came across this yarn again and inspiration struck!  The very next afternoon between homeschooling and library books this Twisted Knot Ear Warmer came into existence.


The lovely, knit-like, detail in the texture of the headband comes from crocheting in the third loop of the half-double crochet below it.  If you haven't done this before it might sound intimidating, but it's really easy once you know what you know where to look!

When working a row of crochet you (generally) end up with a "v" on the top.  The side of the "v" closest to you is referred to as the "front loop" and the side of the "v" further away is the "back loop".  In a half-double crochet there is actually a third loop that's under the "v" that is made from the yarn over (YO) in the stitch.  "HDC in the third loop" means that you are going to create your hdc stitches around this loop under the "v". Doing this will force the "v" to face the front.

Chain 111 using an F hook.

Row 1: Skip the first chain and half-double crochet (HDC) across. This should give you 110 stitches.  Chain 1 and turn.

Row 2: HDC in third loop.

Repeat rows 1 & 2


At this point you have a nice flat, knotless, fabric.  You could sew the ends together and call it a day--that would leave you with a perfectly lovely ear warmer.  However, if you'd like to add a little more flair, then you need one more step.


To achieve the trendy twisted knot we need to sew the ends together just right.  Fold the ends lengthwise so that you end up with four ends.  Alternate the sides and then sew.  I find it helpful to baste first and check to make sure that everything looks right before the final sew.  When sewing the finishing bit, make sure to catch all four layers of fabric.  This is very important!

If you're having trouble envisioning the above step try this first: Make a "c" with both of your hands--your left hand will be a correct "c" and your right will be backwards.  Put them together with your left hand fingers on top, right hand fingers next, left hand thumb, and finally the right hand thumb.

Weave in any ends and enjoy!  (Side note: I know that plastic yarn needles are really popular, but I really love my stainless steel yarn needles.)


Thanks for visiting my blog!  

I love to link up at all of these wonderful blogs!

Other posts that you might enjoy:

 A boy in a red shirt is wearing a crocheted green backpack.  There is wooden fence in the background.  The boy's face is hidden.  

Friday, May 11, 2018

The Watermelon Hat: A Free Knitting Pattern

I received the yarn for this project in exchange for my honest opinion. This post contains affiliate links. This means that if you purchase something after clicking on one of these links I might receive a small commission. This is no way affects the price that you pay.

A girl is wearing a pink, green, and white hat with black beads.

This gorgeous yarn is from Love Knitting.  This fun Watermelon Hat was knitted using MillaMia Naturally Soft Aran in Shocking Pink and Emerald Green.  This yarn is so soft and squishy!  It's such a fun cozy yarn.  Each ball has 87 delicious yards of yarn.  It can be machine washed, but don't put it in the dryer, it needs to dry flat!  There is lovely stitch definition and it was a pleasure to knit.  I'd absolutely love to work with it again!

(I must say though, that while I loved knitting the yarn, trying to get a good picture of the pink, was, well, shockingly difficult!)

This is a close up shot of the hat brim.  The watermelon theme is carried out with the use of color.

The Free Knitting Pattern

Begin knitting this hat with size 5.5 circular knitting needles.  I knit the entire hat on circular needles using the magic loop technique.

With GREEN yarn. 
Cast on 80.  Join, being super careful not to twist.  I used the crochet hook cast on method, I really like the look and I'm super comfortable with a crochet hook!

Work a rib knit for about one inch, I had six rows.  I used a K1P1 rib knit, but you could use a K2P2 rib knit, whichever you prefer.

With white yarn.

Knit around.

Switch to size 6 circular knitting needles.

With Pink Yarn

Before knitting with the pink yarn you must add your "seeds".  When choosing your beads be sure that they will easily string onto the yarn.  I used some black beads, very much like these beads, from my craft hoard.  Use my yarn threading tip to make it easier and then thread on about 100 beads.  You will need to continually push the beads down towards the ball of yarn while you're knitting.  If you find this tiresome you could sew the beads on individually after you've finished knitting.  I randomly allowed the beads to be worked in.

Knit around.  Continue until hat reaches about four and a half inches high.  For reference, I knit 21 rows in pink before my first decrease row.

Decreases:
Round 1: *Knit 20 Stitches. Place stitch marker* four times around to end of round.
Round 2: *K1, K2tog, Knit to two stitches before next marker, SSK* four times around.
Repeat round 2 until there are 16 stitches remaining.
Round 3: K2tog around.
Break yarn and weave it through the remaining 8 stitches.  Finish off!


A note about the sizing of this hat.  My lovely daughter modeled this hat for me.  As you can see it fits her comfortably with just a slight amount of slouch.  The hat also fits me quite well.  Her head circumference is about 21 inches and mine is 22 inches.  

A smiling girl is wearing a knitted watermelon hat.


Thursday, April 26, 2018

Little Green Adventurer Backpack

I received the yarn for this project in exchange for my honest review.  This post contains affiliate links.  This means that if you purchase something after clicking on one of these links I might receive a small commission.  This is no way affects the price that you pay.

A boy in a red shirt is wearing a crocheted green backpack.  There is wooden fence in the background.  The boy's face is hidden.

When Love Knitting asked if I would be interested in reviewing some of their yarn, of course my answer was yes!  Who's surprised?  No one?

Yarn My middle child's favorite color is green, and it was his turn for some Mama made goodies, so this Main Street Yarns Shiny + Soft in Grass Green was perfect.  It is a 100% acrylic yarn.  It can be machine washed and dried, a huge plus for a kid's item!  The skein had 356 yards, which was a perfect amount for this project, I had only the tiniest amount of leftover yarn.  The yarn worked up quite easily with nice stitch definition.  It is nice and soft right out of the box.  There's a slight sheen, or shininess, to it.

Hook I used my Clover Amour size 7 crochet hook.  This is a little smaller than the recommended hook size of H/5 mm.  I wanted the body of the bag to be rather densely crocheted, to keep all of my little adventurer's finds from escaping.

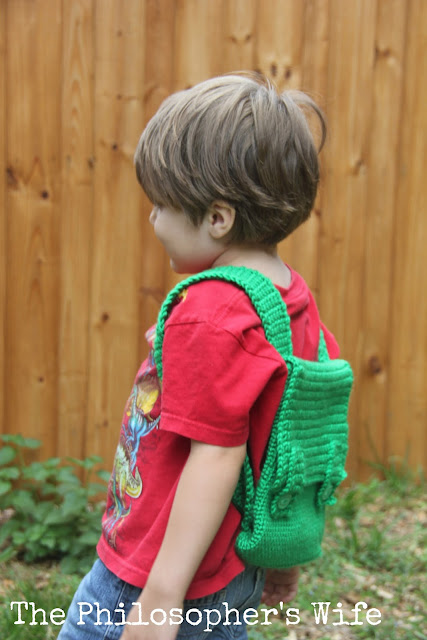
The boy is wearing a red shirt.  He is stretching his arms out, along with the green straps of his backpack.


(Free!) Crochet Pattern

Bag

Chain 26.

Round 1 IN TOP LOOP ONLY Single crochet (sc) in second chain (ch) from hook, and in each of the next 23 chains (24 sc). Work 3 sc in the last chain.  Work back down foundation chain in opposite loop. (23) 3 sc in  last chain. slip stitch to join.

Round 2 Chain 1. (Working in both loops) 2 sc in the first stitch. Sc in next 23sc. 2 sc in each of the next 3 sc. Sc in next 23 stitches.  2sc in each of the next 2 sc. slip stitch to join.

Round 3 2 sc in first sc from previous round.  Sc in next 25. 2sc in next stitch. 1 sc. 2sc in next stitch (at the "end" of the oval). 1 sc in next stitch. 2 sc in next stitch. 25 sc. 2 sc in same stitch. 1 sc. 2 sc in next stitch ("end" of oval). 1 sc. slip stitch to join.

Round 4 2sc in 1st stitch. 28 sc.  2sc in next stitch. 1 sc. 2sc in next stitch (at the "end"). 1 sc in next stitch. 2 sc in next stitch. 28 sc2 sc in same stitch. 1 sc. 2 sc in next stitch ("end"). 1 sc. slip stitch to join.

Round 5 Chain 1. IN TOP LOOP ONLY sc around. Slip stitch to join.

Rounds 6-44 Chain 1. Sc around. Slip stitch to join. (72 stitches total)

Round 44 Chain 1. Sc 4. 32 in back loop (inside the bag) only.  36 sc. slip stitch to join. (Note: the 32 back loop only should be centered along the back of the bag.  Adjust accordingly if needed.  This is where the flap will be added later.)

Round 45 Chain 2. sc around. (72)

Round 46 Slip stitch around.

Flap

Row 1 Single crochet in each of the front loops left from round 44.  (32)

Rows 2-27 Chain 1. Turn. Sc across. (32)

Strap 

Make two.

Chain 7.

Row 1 Sc in second chain from hook.  Sc across. (6)

Rows 2-72 Chain 1. Turn. Sc across. (6)

Button Flaps

Chain 5.

Row 1 Sc in second chain from hook.  Sc across. (4 sc stitches)

Rows 2-12 Chain 1. Turn. Sc across. (4)

Row 13 Chain 1. Turn. 1 sc 2 ch 1 sc. (This forms the button hole.)

Rows 14 & 15  Chain 1. Turn. Sc across. (4)

Finishing Sc evenly around, with three stitches in each corner.

Assembly

Whip stitch the straps to the bag, lining up the edge of the strap with the edge of the flap.

SC around all edges other than the opening.

Whip stitch the button flaps onto the bag flap.

Sew buttons.

Enjoy!


This is a side view of the little boy in a red shirt with a green backpack.  He is ready for an adventure!

Monday, February 6, 2017

Be My Valentine: Crochet Heart (Free Pattern)

This post contains affiliate links.

Here's a unique Valentine to give this February!  Of course, it makes a sweet little gift anytime of the year!

Materials
I used Sugar 'n Cream cotton yarn and an H hook. (I find it rather amusing that all but one of these colors has "hot" in the name.)

Pattern Notes
This is not a tested pattern.  It also presupposes a basic knowledge of crochet.  I'd rate this as an advanced beginner pattern.

Free Crochet Heart Pattern

Round 1 (Hot Pink)
Chain 4. Join.  Start like a basic granny square: chain 2, 2 dc, chain two, three dc. chain two, three dc.chain two, three dc. chain two, three dc. Chain two, join.

Round 2 (Beach Glass)
 3 dc, ch 2, 3dc in each corner, chain one between each corner.

Round 3 (Hot Purple)
Slip stitch to join in a corner.  10 triple crochet stitches into the chain one space.  Slip stitch in corner. 10 triple crochet stitches into the chain one space.

Round 4 (Hot Blue)
Single stitch around.
Note: Chain 2 at heart point.
Note: On purple, single crochet in each stitch but chain one between each stitch.

Round 5 (Hot Orange)
Slip stitch in back loop of the blue.
Note: Chain two at the point.

Weave in your ends and enjoy!


As always, I enjoy sharing my projects around the blogosphere.  Here are the some of the places where I link up!


Saturday, January 7, 2017

Granny Stripe Hat

This post contains affiliate links.


This Granny Stripe Hat is my first of the Granny-Spiration Project.  (Read more about this below, and be sure to enter the giveaway!)  This is an easy hat to crochet and works up quite quickly.

I used an H hook and Caron Simply Soft.

A note about fit and size:  This is a slouchy hat.  My lovely model has a larger than average head circumference for her age.  This hat would properly fit teens and ladies.

Chain 5. Join.

Row 1  *Two dc, chain 1*around until there are six groups of 2dc.

Row 2  Crochet 2 groups of 2dc in each chain one space of previous row, make sure to chain one between each group. (12 groups of 2dc)

Rows 3 &4 Crochet 3dc in each chain one space, keeping the chain one between each group.

Row 5 Crochet 2 dc groups of three in each chain 1 space (always have a chain one between each group)

Row 6 - 10 3 dc groups in each chain with a chain 1 between each one.

Row 11 HDC around.

Rows 12 through 15 HDC in the third loop.  Finish off.


This Month's Giveaway is sponsored by EyeLoveKnots. 

One winner will receive a $10 Etsy Card to spend in any shop on Etsy!

a Rafflecopter giveaway

Must be 18 or older to enter. Open to all countries. Gift card has been purchased in US Dollars. If recipient is outside of the US, to use gift card, must go into Etsy settings and temporarily change to US Dollars. Void where prohibited. Winner has 48 hours to respond to email notification, or another winner will be chosen. EyeLoveKnots is responsible for prize fulfillment and shipment.


New Granny-Spiration Projects will be shared from your hosts the first Saturday of each month. Post times will vary. You will be able to link up from 9am EST on the first Saturday of the month, through 11:59pm EST on the second Thursday from the start date - specific dates are on top of the Rafflecopter form - giving you almost two weeks to link up and enter the giveaway! Please share projects that are family friendly, and GRANNY INSPIRED through use of regular granny square or solid granny square, granny stitch pattern or other afghan square in the form of a free pattern, pattern review, or inspiration piece. Not limited to crochet or knit.

*Please make sure to link to your post, and not your homepage.

 *If you don't have a blog, you can still share with us by creating a Free Flickr Account - powered by Yahoo. Add your projects there, and then come back here with the link for the project.

 *Link ups cannot be to Etsy listings or Ravelry pages where patterns are sold. You can link to blog posts, Flickr or Facebook pages, Pins, etc that are directed towards it, but can't directly link to it. To be clearer though, Raverly pages of finished projects are okay to share. Sorry for the inconvenience! That's per InLinkz guidelines. Thanks!

 *Features may be chosen at the discretion of each host. By linking up, you give us permission to feature your item.

Wednesday, November 23, 2016

The Sterling Unicorn Hat

This post contains affiliate links.  This post is sponsored.  Everything here is my own honest opinion.


This is my favorite hat right now.  I had such fun crocheting it!  This hat uses two of my favorite yarns, and I think both are stunning together.  The name of the hat is a simple mash up of the yarn colorways, but I think that it totally works!


Yarns Used
Unicorn Fields DK by Kimarie's Knit Knacks
This is 246 yards of 75% Merino & 25% Nylon hand dyed loveliness.  It even has sparkles!  Can I say that again?  My unicorn yarn has sparkles! It can be machine washed.  It is very soft and works up wonderfully.  I didn't encounter any tangles or messy bits.  Overall, it's an ideal yarn.


Marshall Island Sport in Sterling by String Theory Hand Dyed Yarn 
This is the same that I used on my Cherry Twist Hat and you can read all the details about the yarn there.


Hooks Used
Clover Amour H
Clover Amour I
(My Clover Amour hooks are my favorites!)


Pattern

Please Note: This is an untested pattern.  This pattern is made from the notes that I made while crocheting the hat.  If you encounter any problems or mistakes in the pattern I would greatly appreciate if you'd let me know and I'll do my best to help and/or correct the pattern.

Using H hook:

Chain 79.
Join without twisting.
Rows 1 - 6: 78 sc across, slip stitch into first stitch.

Using I hook:

Step 1: Using grey yarn: ch 4, dc in the first st (this counts as your first V stitch). *Skip 2 sts, [dc, ch 1, dc] in the next st. Repeat from * until 2 sts remain.  (This is a fairly standard starting row of V stitches). Slip stitch together.  Pull a long loop of yarn out -- enough that your work won't unravel while you work the next row.  NOTE: You will be alternating which yarn you are working with, but you will not be finishing off each row.

Step 2: Using unicorn yarn: Chain 3 in ch sp of 1st V st of previous round 2 DC. Three DC in each ch sp around.  Join with a slip stitch.  Again, pull a long loop of yarn so that this row won't unravel while you're working the next.

Step 3: Using grey yarn: Put your hook into the long loop of grey. Chain 4 and dc between first and last V of the grey round (note, this is not in the ch sp, but between the Vs). [Dc, ch 1, dc] between the earlier grey V stitches around.  Close with a slip stitch.  Pull out long loop of yarn.  (This is the row where the magic happens for this hat.  This row is how the unicorn clusters are surrounded and made to pop.  It does take a little getting used to -- you are working this new row with the row from not the last row but the row before that one. )

Step 4: Using unicorn yarn: Chain 3 in ch sp of 1st V st of previous round 2 DC. Three DC in each ch sp around.  Join with a slip stitch.  Again, pull a long loop of yarn so that this row won't unravel while you're working the next.

Work steps 3 & 4 until you reach your desired length.


Decrease part of the crown:

Using grey yarn.  *V stitch in first space.  1 dc in next space.*  Repeat around.
Using Unicorn yarn *3 dcs in each V space.* Repeat around.
Using grey yarn. Create a faux V stitch with a (dc, ch 1, dc) around, placing a dc on either side of the single dc in the spaces of the grey row below (continuing to capture the Unicorn yarn). Repeat around.
Using Unicorn yarn. *3 dcs in each faux V space.* Repeat around.
Using grey yarn. *V stitch in space between unicorn dc group (capturing the
Using Unicon *3 dcs in each V space.* Repeat around.
Using grey yarn.  *1 dc in space of each Unicorn group from below most recent row of unicorn stitches.1
Using grey yarn. DC2TG around.
If necessary, sc2tg around.

Finish off.


This was a mash up made in yarn heaven.  Both shops were wonderful to work with -- businesslike and friendly.  I highly recommend both Kimarie's Knit Knacks and String Theory Hand Dyed Yarn, as such both can be found in my Best Little Yarn Shops Gift Guide.


I will be sharing this post at some of these awesome parties!


Sunday, October 30, 2016

A Free Crochet Pattern: Peacock Hood

 This post contains affiliate links.


I loved crocheting this Peacock Hood!  I was lucky enough to get my hands on a couple of Caron Cakes in Gelato during the initial release.  I knew I wanted to crochet something using the crocodile stitch and, after much frogging and indecision, happened to create this adorable hood.

I must admit, I was originally hoping that this could be a one skein project, but that didn't happen.  It uses about one and a third.  (Which means that I have another Caron Cakes project in the works!)

I used my H hook.


A bit of a disclaimer: This is an untested pattern.  I wrote the pattern using the notes that I made while crocheting.  If you make this pattern I do welcome your comments and corrections, but please be kind.
1. Chain 109.   This is a multiple of 6 + 1, which is generally recommended for a crocodile stitch starting chain.  (It's 18 x 6 and then add one.)

2. Build your feather foundation, also sometimes referred to as the crocodile stitch ladder.  Do this by chaining three (which will act as your first double crochet stitch). Double crochet into the fourth chain from the hook.  *Chain one.  Skip two chains. Two double crochet into next stitch.* Repeat till end where you should work two dc into the final chain.


3. Turn your foundation ladder so that it is hanging down.To make each feather (or crocidele scale), you’re going to work stitches around the posts of the double crochet stitches that serve as the ladder rungs.   *Chain one then five double crochets down the post of the ladder, chain one, and then five double crochets up the post of the other rung pair. Skip the next pair of rungs.*   Continue along the length of the foundation row/ladder working down and then up each set of rungs.  You should end with a feather/crocodile scale in the last pair of rungs for a total of 19 feathers.  Note: You will need to flip your work around a bit as you're working.

4.   At this point your feathers are going to look a bit ruffled.  Don't worry!  This next row works as both the foundation for the subsequent row and locks the previous row neatly into place.  You are now going to work pairs of double crochet, separated by one chain, worked into the gap between one of the pairs of double crochet stitches below.  You will alternate between working your dcs into the space between scales as well as into the gap between dcs.  This means that you should have the same number of double crochet pairs throughout this entire section and that they should line up on top of one another.


5. It's time for another row of feathers!  However, the feathers need to be offset from the row below, so this row will have 18 feathers.  Chain two, skip the first set of double crochets/ladder rungs, and work your feather into the second set.  Continue as before, with five double crochets down the post of the ladder, chain one, and then five double crochets up the post of the other rung pair. Skip the next pair of rungs.


6. Repeat steps three, four, and five until you reach your desired length, to replicate my project you need seven rows of feathers.  It works best to end on a row with 19 feathers.

7. For the final row of the scarf portion of the hoodie the locking in mechanism changes slightly.  Work as step four instructs, however, use single crochet stitches over the first four feathers, switching to double crochet between feathers four and five.  You will mirror this for the other end of the scarf; between the fifth and fourth LAST feathers switch back to single crochet.


8. Now for the hood! Slip stitch (with the v's on the wrong side) to the first double crochet group.  Work 12  feathers into the double crochet row as normal, stopping once you reach the single crochet stitches.

9. Work step four's locking in row, only crocheting in the double crochet stitches.  We are no longer worried at all about the scarf part -- that's finished!

10. Work 11 feathers, this is the offset row so it has one less.


11. Continue working rows of 12 feathers, foundation, 11 feathers until your hood is as high as you'd like.  Mine is 14 row of feathers (not including the scarf portion).

12.  For the final locking in row use single crochet instead of double crochet.

13. At this point you will have what looks like a long skinny rectangle with another rectangle on top of it.  Fold it in half and slip stitch across the top.

14. Weave in ends and enjoy!


I used one of my Lilla Rose Flexi clips as a shawl pin for Catherine's Peacock Hood.  It would be super easy to add some fun buttons or toggles as well.


Thursday, September 8, 2016

Bluebell Dress: Pattern Review

This is a sponsored post.  This post may contain affiliate links.


If I were to transform a doll dress into something I would wear it would be the Bluebell Dress by My Childhood Treasures.  I love this combination of a cute and girly dress with a fun and comfortable hoodie.  Seriously, I want one!  I will have to live vicariously through dolls for now I suppose.  (Although, I do have the Lane Raglan and it shouldn't be too hard to add a circle skirt to the bottom.  I might just have to make this a reality.)


The dress was easy to put together, especially with the clear instructions.  As you can probably tell, I currently have no nice white velcro.  I've been meaning to go to the craft store to pick some up, but life keeps getting in the way.  I could just order some on Amazon, but I have the urge to explore the magical craft store aisles.  That's why you see those ugly black bits of velcro peeking out.  I tacked some in quickly so that Catherine could use the dresses.  This pattern is awesome though and I know that I'll be making more.  I definitely recommend this pattern.

I just have to say, I love how little fabric it takes to sew doll clothes!  During this Dolled Up Event I finally have found a use for my scrap bin!  (I'm sure you have one too -- it's filled with pieces of fabric too big to toss, but so small that they never really work for another project.)  These dresses are made entirely of scraps from fabric I got at Girl Charlee.  (You can see some of the fabric on Catherine's Hearts Hoodie and my Julia Women's Cardigan.)


My Childhood Treasures is generously sponsoring a giveaway.  One lucky winner will receive a doll clothes pattern of your choice from the shop.


Details and Fine Print:  Ends 9/26/16.  Void where prohibited. Must be 18+ to enter. US only. Facebook and other social media are not affiliated with this giveaway. The Philosopher's Wife is not responsible for prize fulfilment or shipment. You must respond to my email within 48 hours or a new winner will be drawn.
a Rafflecopter giveaway

Sunday, September 4, 2016

Sandbox Shorts: Pattern Review

This is a sponsored post.  This page may contain affiliate links. 

Are you looking for an adorable shorts pattern for your doll?  Then you should check out the Sandbox Shorts by Oh Sew Kat!  


I particularly like the flat front; the shorts just look so much more professional with the flat front. Most of the other doll shorts patterns I've seen lacked this detail. 


These shorts are an easy sew.  Like the Popsicle Top, the instructions are very well written and include lots of photos.  This pattern is especially awesome because it includes three different styles: Classic, Bermuda, and Wide Leg.  The brown floral shorts that I made are Classic, without pockets.  (Catherine didn't want to cover up the fun flowers, so I didn't.)  

While this is a fairly simple pattern, the possibilities are endless!  It's so versatile!  Different trims and different fabrics will give you anything from gym clothes to special occasion wear.   

Please take a moment to visit Oh Sew Kat! and follow her on social media.  
Facebook    Twitter    Instagram    Pinterest 

Oh Sew Kat! is sponsoring a giveaway!

Buy the Sandbox Shorts at CraftsyEtsy, or on the Oh Sew Kat! website.


Popsicle Top: Pattern Review

This is a sponsored post.  This page may contain affiliate links. 


The Popsicle Top by Oh Sew Kat is the perfect shirt pattern for your doll!  It's a simple tank, so it can be paired with just about anything, plus it can be reversible and it's easy to embellish.  I highly recommend this sewing pattern.


The Popsicle Top is an easy sewing pattern.  The instructions are also very clear and include lots of pictures.  (If you want to just print straightforward instructions there's a page for that too!)  I've been sewing off and on for a while, but I think even someone just learning to sew would be able to make the Popsicle Top.


This is a great project for either fat quarters or the leftovers from other projects.  I used random bits from my scrap bin and I just love how these shirts turned out!  I'm excited though, because now I have a perfect project anytime I fall in love with a fat quarter and just "need" to have it.  (I do need to remember to get some more Velcro, I only had a teeny amount in my stash.  If you're making doll clothes you're going to want some extra on hand too!)


I don't know about you, but whenever I use anything from my scrap bag I am reminded of the original projects.  The above top is made from some scraps from my Fabric Headbands, a dress I cut up for fabric, and some bias tape from the edging of a quilt for Catherine.  It's a walk down memory lane!  (Also pictured are the Sandbox Shorts, also by Oh Sew Kat!, and a little sweater I knitted which is modeled after the In Threes Sweater.)


This top and skirt set is made with some of my my favorite quilting cotton.  I made matching Mommy and Me Easter dresses with it one year.  (Art Gallery has a gorgeous knit fabric that is quite similar that I'd absolutely love to have!)


Buy the Popsicle Top at Craftsy, Etsy, or on the Oh Sew Kat! website.

If you're looking for an easy doll skirt pattern that pairs perfectly with the Popsicle Top, Oh Sew Kat has you covered.  Sign up for her email list and she'll send you the free pattern!


Please take a moment to visit Oh Sew Kat! and follow her on social media.